This year has been anything but normal. Typically this time of year is filled with get togethers and holiday celebrations. Instead of gathering for a Christmas party, due to safety reasons, some friends and us, my boyfriend and I, decided to have a gingerbread house competition. We used Zoom to showcase our creations, vote and announce the winners.
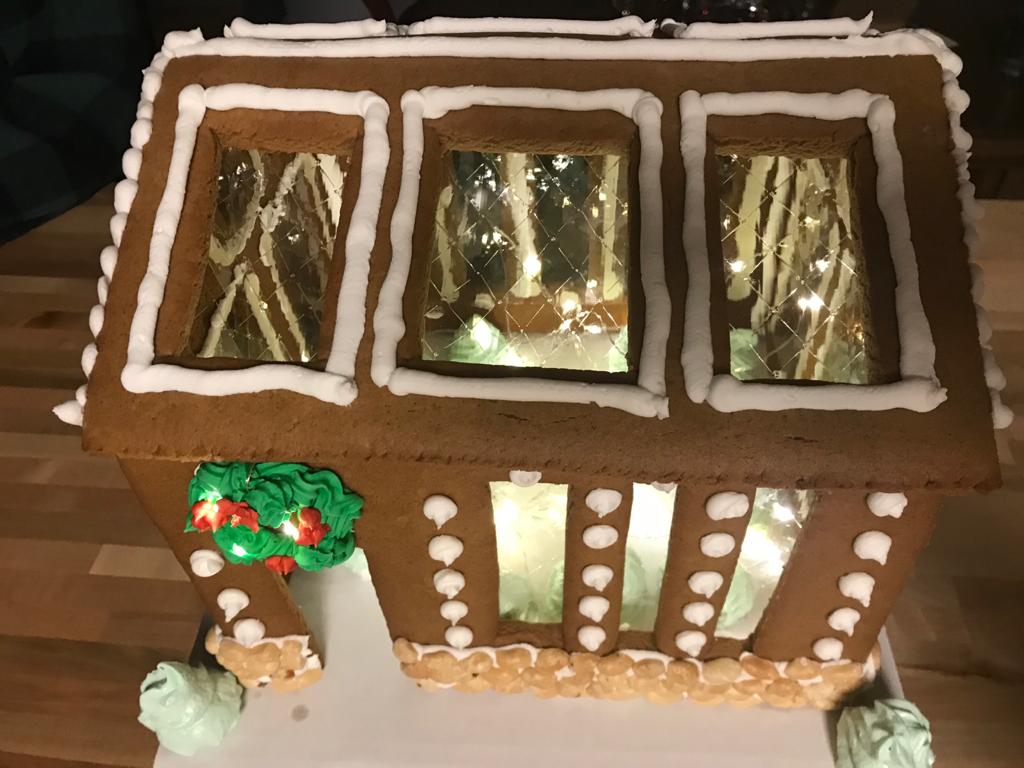
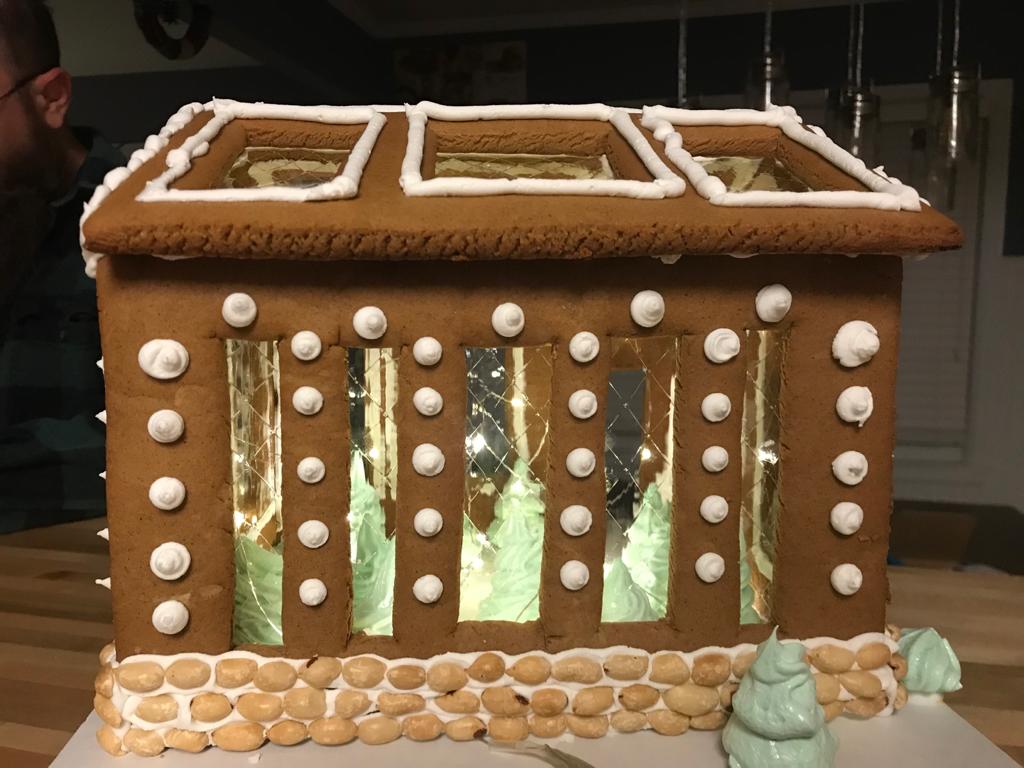
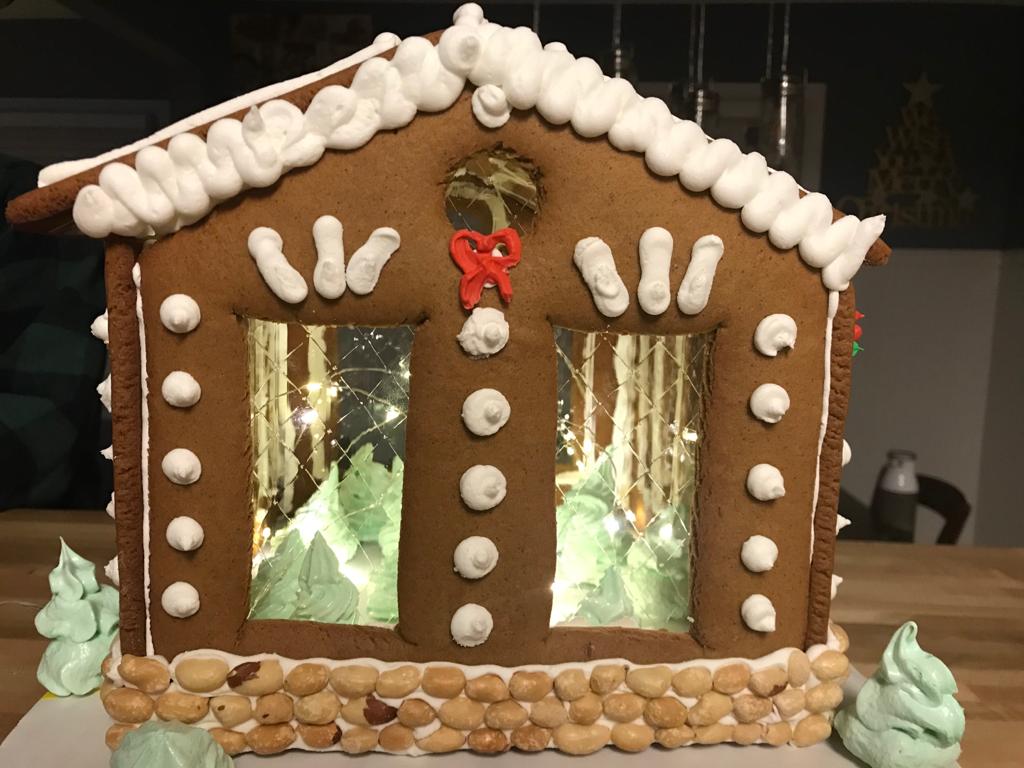
Now what should our gingerbread house look like? For the past few years, I have started growing my love for gardening. So, when I started thinking about the design, I came up with a gingerbread greenhouse. All of the walls and the roof had windows. There were meringue trees inside. As a finishing touch, there were fairy lights inside to illuminate everything.

Now, if this is something you want to do, be prepared for a lengthy amount of time to dedicate to the project. Do not expect to throw this together in an hour. In total, it took about 8 to 10 hours to complete. When you have decided on your design, you will want to make paper cutout for templates to use when cutting your gingerbread pieces. Once you are ready to assemble, you will want to use a sturdy royal icing to ensure your pieces stick together. For decorating, you can use both the sturdier icing and/or a thinner royal icing, whatever fits your fancy. Be as creative as you like.
The baking and assembly went smoothly. For the “glass” for the windows, I used gelatin sheets. The sheets have a crisscross pattern that lends itself to beautiful beveled windows. Along the bottom of the greenhouse, to imitate cream city bricks, we used peanuts. Above the doorway we wanted to have a wreath, which I made out of royal icing that I dyed green and red. My boyfriend had the ingenious idea to use some of the fairy lights in the wreath. The rest of the design we kept pretty simple with polka dots and a sunbursts above the side windows.
There were seven entries, including ours, in the competition. Everyone voted in two categories, best overall and most original. Although our gingerbread greenhouse did not win, we got to spread our creativity wings and had an evening full of laughs, games and fun virtually with friends.
Don’t forget to follow the Vintage Baker blog for more great recipes! You can also follow me on Facebook.
Gingerbread for Gingerbread Houses
Ingredients:
1 1/2 Cups Shortening
1 1/4 Cups Sugar
2/3 Cup Molasses
3 Eggs
7 Cups Flour
1 Tablespoon Ground Cinnamon
1 1/2 Tablespoons Ground Ginger
1 1/2 Teaspoons Baking Soda
3/4 Teaspoon Salt
Directions:
In a large bowl, whisk the flour, cinnamon, ginger, baking soda and salt to combine. Then set aside.
In the bowl of a stand mixer fitted with the paddle attachment, or a large bowl and using an electric hand mixer, cream the shortening and sugar on medium speed until light and fluffy, 4 to 5 minutes.
Add the molasses and mix well to combine, about 30 seconds more. Scrape the bowl well.
Add the eggs one at a time, scraping down the bowl after each is incorporated.
Gradually add the flour mixture to the mixer and beat on low speed to combine.
Scrape the bowl well to make sure the dough is well mixed. Divide the dough into two or three discs and wrap tightly in plastic wrap. Refrigerate until well chilled – at least 4 hours, and up to overnight.
When you are ready to use the dough, roll it out between two sheets of parchment paper to about 1/3 to 1/2 inch thick – you don’t want to roll it too thin because you need it to be sturdy! Peel the parchment paper away occasionally while you work to make sure the dough is not sticking.
When you have reached the right thickness, peel the top piece of parchment paper off and transfer the bottom piece of parchment with the rolled dough on it, to a baking sheet. Use your template to cut the dough into the pieces you will need for your gingerbread house.
Place the baking sheet(s) with your gingerbread pieces into the freezer for at least 10 minutes before they go in the oven, this allows the dough to firm up a bit and will reduce the amount of spreading while baking.
Preheat the oven to 375 degrees Fahrenheit. Once the dough is chilled, place the baking sheet(s) in the oven for 7 to 9 minutes. Allow the baked pieces to cool on the baking sheet(s) for 15 minutes before moving it to the cooling rack to cool completely.
When your gingerbread pieces have completely cooled, use your royal icing to add any design details on the pieces.
When you are ready to assemble the house, have a few cans of soup or vegetables, or anything heavy, ready that you can use as wall support while the icing is drying. Assemble your walls first. Allow the icing to fully dry and firm before attaching the roof.
Once the house is completely assembled and the icing is dry and firm, add any additional décor or fairy lights.
Then stand back and marvel at your creation! Enjoy!
Gingerbread recipe curtesy of Food 52
The royal icing recipe I used for the assembly and decorations of the greenhouse came from Wilton blog.
